Step 1: Grade Ratios
As we all know, a Vanguard Deck must be exactly 50 cards, exactly 16 of which must be Triggers. Most, if not all, decks use a non-trigger, Grade 0 Starting Vanguard, meaning our deck begins with a preset 17 cards allotted to the Grade 0 slot. Knowing this, lets get a template started:
- Grade 0: 17 Cards
- Grade 1: X Cards
- Grade 2: X Cards
- Grade 3: X Cards
- Total Cards left: 33
Now, before we can start picking through the card pool to decide which cards go in our deck, we'll need to decide how many of each grade we can include. The Trial Decks Bushiroad sells tend to have either a 14/12/7 Ratio of Grade 1/2/3, respectively, or a 15/11/7 Ratio of Grade 1/2/3.
Statistically speaking, the ratio of 13/11/9 will give you the highest success rate of riding from Grade 1 to Grade 3, meaning you'll misride the least with it. However, that is only taking riding into account. With only 13 Grade 1's in the deck, you'll likely be hurting for boosters. Statistically speaking again, using a ratio of 14/11/8 will yield essentially the same ride consistency, but adding another booster to the deck can be invaluable. Its very important to remember that not every Grade 1 in your deck will, or even can, be used as a booster. As most (if not all) decks run 4 Perfect Guards, that cuts the number of boosters down to 10 or 9, depending on whatever grade ratio you use. You also have to use a Grade 1 as your first turn ride, dropping you even lower, to 9 and 8 boosters, respectively. Keep in mind that you won't see all of your Grade 1's every game, due to random nature of the deck and drawing.
Statistically speaking, the ratio of 13/11/9 will give you the highest success rate of riding from Grade 1 to Grade 3, meaning you'll misride the least with it. However, that is only taking riding into account. With only 13 Grade 1's in the deck, you'll likely be hurting for boosters. Statistically speaking again, using a ratio of 14/11/8 will yield essentially the same ride consistency, but adding another booster to the deck can be invaluable. Its very important to remember that not every Grade 1 in your deck will, or even can, be used as a booster. As most (if not all) decks run 4 Perfect Guards, that cuts the number of boosters down to 10 or 9, depending on whatever grade ratio you use. You also have to use a Grade 1 as your first turn ride, dropping you even lower, to 9 and 8 boosters, respectively. Keep in mind that you won't see all of your Grade 1's every game, due to random nature of the deck and drawing.
 Generally, I allow my Grade 3's to dictate the ratios of my deck. As a personal rule of thumb, I like to run 7 Grade 3's; that is solely personal preference, and due to my experience of getting massive Grade 3-flooded hands on far too many occasions. However, there are a number of decks where I opt to run 8 Grade 3's rather than 7. For example, Crossride decks. Since the Crossride unit is your main boss, you run 4 of them to ensure you ride them, but in order to ensure you also get their Crossride defense on a consistent basis, you should also run 4 of their base form. This results in an 8 Grade 3 lineup, but due to the nature of the deck, this is perfectly fine, and often necessary. The same thought process applies to Breakride decks: 4 of the Breakride is to make sure you ride it, since its more or less the win condition of the deck, and 4 of your boss unit to guarantee you have the best possible odds of drawing into it and riding it.
For this article, I will be using a deck ratio that uses 7 Grade 3's, simply because that is my preference and how I feel my decks operate most efficiently. If you prefer to run 8 or 9 Grade 3's, just alternate the numbers accordingly and adjust the information in this article to fit your situation. On that same thought, I prefer to run 15 Grade 1's, as it gives me the highest possible odds of riding to Grade 1 and getting boosters on a consistent basis. The Grade 2's are more or less the fill-in-the-blank area. In my decks, the final ratio is usually either 15/11/7 or 15/10/8. I have, in one or two decks, used a 14/11/8 ratio, simply because the Grade 1 lineup ended up putting me in a situation where I had 12 cards I needed to use, but I only ran 2 copies of the final card in the lineup; 3 would have been resulted in dead copies, but including a 1-of unit would muck up the consistency of drawing it, so I opted to use that extra space in the deck somewhere where it could be put to better use.
So, for this article, I will be using this Grade Ratio:
- Grade 0: 17
- Grade 1: 15
- Grade 2: 11
- Grade 3: 7
Step 2: Building Down
The rule of thumb for building decks in Vanguard is to start from the top and work your way down. Your Vanguard is the focus of your deck; the unit you spend the entire game attempting to ride, and the unit whose skills you rely on to generate enough power/advantage to claim victory. Rear Guards are retirable and replaceable, but the Vanguard is the one constant presence on your field, and as such, is the focus of the deck. For this article, this is the Grade 3 I will base my deck around:
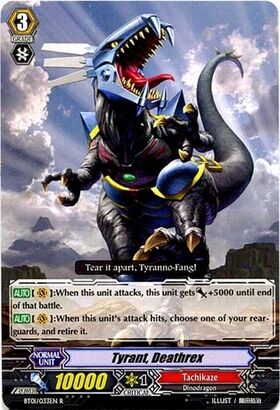
[AUTO][V]: When this unit attacks, it gets Power +5,000 until end of that battle.
[AUTO][V]: When this unit's attack hits, choose one of your Rear Guards and retire it.
Now that I have my Vanguard, and my focus of the deck, its time to analyze his skill and determine what would help him out. His first skill is quite powerful, giving him an unconditional 5,000 boost whenever he attacks, but his second skill is what really needs to be focused on. If he hits, he has to retire one of my units. So, when I build the rest of the deck, I need to keep a close eye on things that could help me in this regard.
Upon further inspection, there are 7 units that could help me out in this regard. For the sake of space and my sanity, I will provide links for them as opposed to including their images and skills:
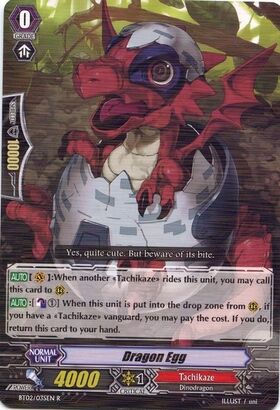
- Dragon Egg
- Raging Dragon, Sparksaurus
- Winged Dragon, Skyptero
- Winged Dragon, Beamptero
- Winged Dragon, Slashptero
- Assault Dragon, Blightops
- Raging Dragon, Blastsaurus
A lot of these are very similar. Blastsaurus and Sparksaurus let you discard 1 card when they are retired in order to call another copy of themselves from the deck. Beamptero and Slashptero both give another card on the field 3,000 Power when they are retired. Skyptero and Dragon Egg, for a cost of 1 Counterblast, will return to the hand after being retired. Blightops, for the same cost, will search out a 10,000 Shield and add it to my hand.
Even with such a large number of units, there is a very good Grade distribution amongst them: one Grade 0, three Grade 1's, two Grade 2's, and a Grade 3. Dragon Egg even operates as a Starting Vanguard, making him an exceptionally good choice. So, from this information, we ca now begin to construct a deck:
Grade 0: 17
1x Dragon Egg
16x Triggers
Grade 1: 15
4x Winged Dragon, Skyptero
4x Raging Dragon, Sparksaurus
4x Winged Dragon, Beamptero
3x TBD
Grade 2: 11
4x Winged Dragon, Slashptero
4x Assault Dragon, Blightops
3x TBD
Grade 3: 7
4x Tyrant, Deathrex
3x Raging Dragon, Blastsaurus
Step 3: Fill in the Gaps
You'll notice that even after I put in all those units, there are still a few missing pieces in the deck. Namely, three Grade 1's and three Grade 2's. All decks should run four Perfect Guards; no ifs, ands, or buts. Given the massive "Final Turn" power of modern decks, with the ability to hit powerlines of 30,000 and above, its important to feel safe about your guarding. However, if I run four Perfect Guards, I'll go over the limit of 15 Grade 1 units. Since I'm prioritizing the inclusion of four Perfect Guards, I'm going to have to remove something else. A quick once-over of all the other Grade 1's reveals that Sparksaurus needs to be run at 4, to ensure I don't draw into all of the copies and make him a dead card, leaving only Beamptero or Skyptero to cut. Since Skyptero has the lower power level, I decide to take one copy out and replace it with the fourth Perfect Guard unit. This is the new Grade 1 lineup:
Grade 1: 15
4x Perfect Guards
4x Winged Dragon, Beamptero
4x Raging Dragon, Sparksaurus
3x Winged Dragon, Skyptero
Now I move on to the empty Grade 2 spot. I notice that the two current Grade 2 units both have 9,000 Power which, while not weak, isn't exactly the strongest there is. So, to add a bit of power to my deck, I decide to include the 10,000 Power Grade 2 unit for the deck, Ravenous Dragon, Megarex. So, my new Grade 2 lineup looks like this:
Grade 2: 11
4x Winged Dragon, Slashptero
4x Assault Dragon, Blightops
3x Ravenous Dragon, Megarex
Step 4: Triggah, please!
 All that's left is to decide on the trigger lineup. Obviously, I'll start with 4 Heal Triggers, since those are all but required, leaving me with any combination of the 12 remaining triggers. Since this deck doesn't have an advantage engine of its own, it would be smart to include Draw Triggers. What's left is deciding between Criticals or Stands. Looking at my Grade 2 and 3 lineup, I see eleven units with 9,000 Power and seven units with 10,000 Power. Since the standard base power level of a Vanguard is 11,000, nothing in my deck can hit my opponent without a boost, and would only force out an additional 5,000 guard if it were to attack with trigger power. Thus, stands are all but useless in this deck, so Criticals will be the main attraction.
The balance between Criticals and Draws is really up to the player's discretion. Honestly, I would recommend messing around with different numbers until you find what works best for you; i.e. what you sack best with. Common ratios of Critical/Draw are 8/4, 7/5, or 6/6, respectively. I have a personal policy of never exceeding 6 draws, because you lose 5,000 Shield for each draw trigger you include over a Critical or a Stand. I like to use 8/4, simply because that is my preference.
With the trigger lineup fleshed out, I now have a fully built, 100% complete deck:
Grade 0: 17
1x Dragon Egg
8x Critical Triggers
4x Draw Triggers
4x Heal Triggers
Grade 1: 15
4x Perfect Guard
4x Raging Dragon, Sparksaurus
4x Winged Dragon, Beamptero
3x Winged Dragon, Skyptero
Grade 2: 11
4x Winged Dragon, Slashptero
4x Assault Dragon, Blightops
3x Ravenous Dragon, Megarex
Grade 3: 7
4x Tyrant, Deathrex
3x Raging Dragon, Blastsaurus
And there you go! That is a fully built, fully analyzed, fully thought-out deck. All that's left is to take it into battle and pwn some n00bs!
Step 5: Forget Everything You've Ever Learned
 So we come back from a fun day at locals, severely disappointed in our deck. It didn't perform nearly as well as we thought it would, and we realize now that there were some glaring holes that we somehow missed during the deck building process. But fret not, for we're still in the middle of building the deck! Sure, you can sit down and think as hard as you want about what to put in a deck, but at the end of the day, the only way to truly master the process is to get out there and play test it. Now that we've finished that aspect, its time to delve back into the deck and patch up the holes.
The biggest glaring problem in this deck: There's no Ironclad Dragon Shieldons in the deck to search with Blightops' skill! We completely forgot to include him in the initial stages of deck building, so during the playtesting we did, Blightops was nothing more than a 9,000 Power Vanilla unit. At this point we can choose to either remove him from the deck completely, or try to make room for the Shieldons. Since that would mess with our Grade ratios, and we have other things to retire anyway, lets just take him out altogether.
Issue number two was that we could never hit any powerlines against our opponents. 7 of our 11 boosters are 6,000 Power and below, meaning they can't force more than 5,000 Guard out of an 11,000 Power Vanguard behind 11 of the 18 attackers that were in the deck. Sparksaurus couldn't hit anything stronger than 15,000 Power behind anything in the deck, even the strongest attacker we had. So, since there's still a good number of targets to retire in the deck, let's just take him out like we did with Blightops.
In the same boat is Blastsaurus. There were tons of games where we were forced to ride him, and with only 9,000 Power on defense and no skills to make up for it, he became more on a hindrance than anything else. Since Beamptero, Skyptero, and Slashptero are still in the deck, we can safely remove Blastsaurus as well, and replace him with something... not terrible.
Step 6: Back to the Drawing Board
So, the deck currently looks like this:
Grade 0: 17
1x Dragon Egg
8x Critical Triggers
4x Draw Triggers
4x Heal Triggers
Grade 1: 15
4x Perfect Guard
4x Empty
4x Winged Dragon, Beamptero
3x Winged Dragon, Skyptero
Grade 2: 11
4x Winged Dragon, Slashptero
4x Empty
3x Ravenous Dragon, Megarex
Grade 3: 7
4x Tyrant, Deathrex
3x Empty
 Moving down to the Grade 2 slot, let's recall the issue of not having enough strong attackers. The only other big-bodied Grade 2 we have access to is Cannon Fire Dragon, Cannon Gear. He has an exceptionally high 11,000 Power, although he has to retire a Rear Guard when he's called. However, since Dragon Egg and Skyptero are still in the deck, that is hardly a cost. It is also helpful to remember that Dark Rex has a secondary skill, which gives 3,000 Power to any unit on the field. Cannon Gear would go up to an unboosted 14,000 Power, which is exceptionally easy to make a 3-stage Powerline with. Cannon Gear is definitely in, but since we don't want to get too many of him at once, we'll only run him at 3, and we'll bump Megarex up to 4.
Grade 0: 17
1x Dragon Egg
8x Critical Triggers
4x Draw Triggers
4x Heal Triggers
Grade 1: 15
4x Perfect Guard
4x Empty
4x Winged Dragon, Beamptero
3x Winged Dragon, Skyptero
Grade 2: 11
4x Winged Dragon, Slashptero
4x Empty
3x Ravenous Dragon, Megarex
Grade 3: 7
4x Tyrant, Deathrex
3x Empty
Again, lets start from the top and work our way downwards. Blastsaurus was a bad partner for Deathrex, as he made for a really bad ride and didn't really help much as a Rear Guard. Delving back into the card pool, we'll see that there are a few other contenders for the slot:
War Chief would make a great Rear Guard, since he becomes 12,000 when he gets boosted, but riding him would only be marginally better than riding Blastsaurus. Raptor Colonel has an extremely powerful skill as a Vanguard, so having to ride him wouldn't be an issue, but that also means he's competing with Deathrex for the Vanguard slot, which isn't very synergistic. Dark Rex, however, looks very promising. He works extremely well in conjunction with Deathrex, so the deck would allow the main Vanguard to be in the Vanguard zone but still function perfectly well. Additionally, his cost of 3 retires can be mitigated by the tons of retire fodder in the deck, and he works almost unrealistically well in conjunction with Beamptero and Slashptero. Dark Rex is definitely a keeper.
Moving down to the Grade 2 slot, let's recall the issue of not having enough strong attackers. The only other big-bodied Grade 2 we have access to is Cannon Fire Dragon, Cannon Gear. He has an exceptionally high 11,000 Power, although he has to retire a Rear Guard when he's called. However, since Dragon Egg and Skyptero are still in the deck, that is hardly a cost. It is also helpful to remember that Dark Rex has a secondary skill, which gives 3,000 Power to any unit on the field. Cannon Gear would go up to an unboosted 14,000 Power, which is exceptionally easy to make a 3-stage Powerline with. Cannon Gear is definitely in, but since we don't want to get too many of him at once, we'll only run him at 3, and we'll bump Megarex up to 4.
Finally, we make it back down to our Grade 1's. Still remembering that the deck suffered from powerline problems, and that we have enough retire fodder, there's only one unit left in the card pool that could fulfill the niche: Sonic Noa, the 8,000 Power Vanilla. Thinking about Dark Rex again, this guy would be an 11,000 Power booster if we used Dark Rex's skill on him, meaning he would hit a 3-stage attack when boosting just about any attacker in the deck. We'll replace the 4-of Sparksaurus with 4 of this guy.
Now let's look at the deck again:
Grade 0: 17
1x Dragon Egg
8x Critical Triggers
4x Draw Triggers
4x Heal Triggers
Grade 1: 15
4x Perfect Guard
4x Sonic Noa
4x Winged Dragon, Beamptero
3x Winged Dragon, Skyptero
Grade 2: 11
4x Winged Dragon, Slashptero
4x Ravenous Dragon, Megarex
3x Cannon Fire Dragon, Cannon Gear
Grade 3: 7
4x Tyrant, Deathrex
3x Destruction Dragon, Dark Rex
And there we go! The actual final form of the deck. Having created it, tested it, and edited it, this deck is now 100%, truly, fully complete. Now everyone at locals will be expecting the old, crappy deck from before, so when they're faced with this monstrosity, they won't know what to expect!
Step 7: Just Kidding
Hah, you thought the deck was actually 100%, truly, fully complete? Hah! Yes, the deck has been re-edited and the problems from the first draft were remedied, there is no guarantee that it is at its utmost best. You should always extensively playtest any deck you build, before and after any edits you make, before finally deciding that it is "complete." Changing one problem might cause an entirely new one to arise, so you should always be on your toes. Changes don't even have to be the complete removal of cards and additions of new ones; it could be as simple as swapping the numbers of two cards. Maybe you'd find that you don't see Skyptero enough, so you would run 4 of him and only 3 Beamptero. Maybe you'd find that you don't draw into Dark Rex enough, so you would change the Grade Ratios to accommodate 8 Grade 3's, or even mess with the trigger lineup to include more draws. The testing never truly stops, and only when you're completely convinced that you've tested the deck for a unhealthy period of time, and that you absolutely can't change it to make it any better, can you declare it 100% complete. Then you can move on to mastering the strategies of the game and pwning those n00bs at locals!
No comments:
Post a Comment